These days it is very easy to get set up with a new website and hosting package with a company like Bluehost.
If you’re like me, you used a quick and easy, step by step guide like the one in this video by Pat Flynn:
Bluehost and others provide some easy quick start set up for new customers.
The challenge comes in adding a second website to your account.
Yes, you can add another website to your account with no additional cost other than the cost of purchasing another domain name.
What if you want to start another website? Or you want to add another blog?
Or, what if you want to create a website for the launch of your next book?
Do you have to hire a web developer to get set up?
You could, but you don’t have to. The step-by-step process in this post is what I used to set up many more websites to my Bluehost account.
The first time I did this, it took me about three hours. I was travelling and basically up all night trying to figure it out.
Now, it takes me about twenty minutes from the time I buy the domain name to the time WordPress is completely set up and ready to go on a second addon domain.
I created this step by step checklist to help anyone interested in adding a second website to their portfolio.
Setting Up WordPress on a Second Addon Domain in Bluehost
Here is how to install WordPress on a second addon domain in your Bluehost account.
1. Select and purchase your website address (domain name).
I like to use my Bluehost account to keep things simple. You might want to use Namecheap to save some money or Hover, which has a lot of great tools for discovering new domains.
2. Assign the domain as an “addon domain.”
- Login to your Bluehost account. Click on “domains” in the top menu bar.
- Find the domain name you want to use. Click on the “Unassigned” link next to the name.
- Follow the steps on this page and create and name the addon directory and sub-domain. (To simplify things, just pick the default that they suggest.)
(Honestly, you shouldn’t worry about what all this means.)
3. Create a new MySQL database and user.
Okay, don’t freak out. I know the word “database” can sound too technical. This can seem tricky because of all the fancy tech words. It really isn’t as bad as it sounds, though. Here’s what you do:
- From the cPanel, click on the MySQL databases icon.
- Pick a name for your database. (If you followed Pat Flynn’s video above, then Bluehost sets up your initial WordPress database for your. It looks something like this: websit1_wrd1 or websit1_02. Make up your own name or follow in the same “wrd##” pattern for each new website in your account.)
- Add a new database user. (To keep it simple, use the same thing as your database name. Note: I’m no security expert on this!)
- Create a new database password with the Password Generator. (Write it down!)
- Add your new User to the Database.
- Check All Privileges.
When you are finished, return to the cPanel.
4. Install WordPress.
This is actually the easy part:
- Go to WordPress.org and download the latest version of WordPress.
- Open the File Manager in your Bluehost cPanel and select your new domain. This will take you to the main folder for your website.
- Upload the WordPress zip file into the main file folder.
- Right-click on the zip file and extract all files to the main folder.
- Open the WordPress folder.
- Select all of the files. Right click and move them to the main folder.
- Delete the empty WordPress folder and the WordPress zip file.
5. Connect WordPress to your database.
This part may sound scarier than it is. It will only take a few minutes.
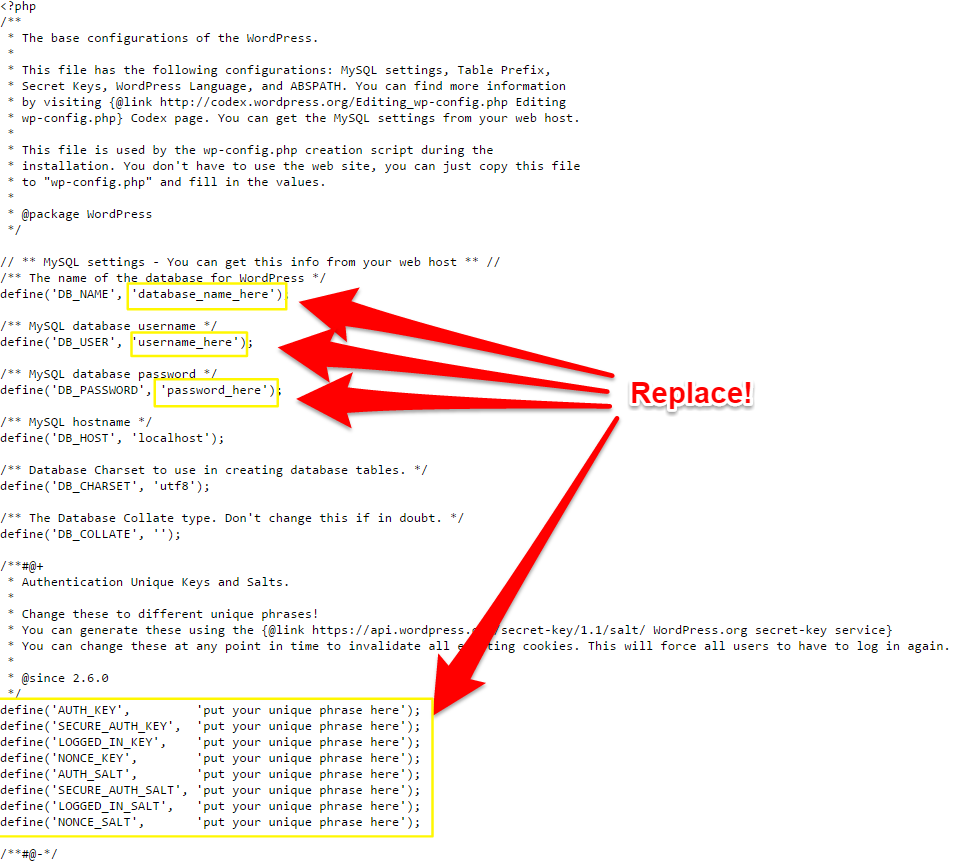
- Find the wp-config-sample.php file. Right click and edit.
- Replace the database_name_here, username_here, and password_here with the database, user, and password from step 3. Make sure you copy and paste within the two quote marks and that there are no spaces before or after each one.
- Generate a new Authentication Unique Keys and Salts by going to: https://api.wordpress.org/secret-key/1.1/salt/
- Copy the new code and all eight lines of dummy code in the config file.
- Click save.
- Rename the wp-config-sample.php file to wp-config.php

6. Start WordPress
If everything was setup correctly at this point, then you should be good to go! Here’s how to get started:
- Go to www.yourdomain.com/wp-admin
- You should see the WordPress logo and some step-by-step instructions to get started! (If you get an error, then you need to go back and check to make sure that you edited the wp-config.php file correctly.)
- Pick a site title (this can be changed later), WordPress username, and WordPress password. Deselect the options for search engines to crawl your site. You can add that later once you put some content up.
- Install!
Next Steps
What’s next?
Well, if you haven’t done so already, get yourself set up on Bluehost.
After you are set up, go find yourself a good-looking WordPress theme. (I am a Genesis Studiopress guy myself.)
Then, install some of your favorite Wordprss plugins.
Here the list of my favorites:
The Essential WordPress Plugins Checklist
See, that wasn’t so hard!
You won’t even have to hire someone to do all this.
Now, back to your writing!